Spruce phone numbers allow you to call and SMS with your patients and are owned by your practice and can be ported out if you ever leave. Spruce Links are unique URLs associated with your practice that represent the connection point a patient uses when they download the Spruce patient app and connect to your practice for secure messaging or video calling. Both phone numbers and Spruce Links are managed from your account settings.
IN THIS ARTICLE
Introduction to Ownership and Management
Through Spruce you can manage who on your team is able to view specific patient conversations for additional privacy. You can do this through Spruce Link and Phone Number Membership. By default, everyone on your team is a member of all conversations. Read on to learn how to change this. If you would prefer a video tutorial please watch this nine-minute video on setting up direct phone numbers and Spruce Links:
Phone Number Ownership and Management
If you have multiple numbers on your account you can manage which team members have access to the communication to and from that number. Every time you initiate a phone call or a standard SMS text message, it will come from a phone number on your Spruce account.
Managing Ownership
You can determine who is the owner of a specific phone number and restrict who can view conversations using specific phone numbers. If someone is an owner, this means that they will be able to see all communication related to this phone number. They'll be able to initiate phone calls and text messages from this phone number and will see any incoming calls, voicemails, and text messages to this phone number. Non-owners or non-members will not have access to correspondence regarding this phone number. They will not be able to see incoming call, voicemails, or text messages to this number. This is helpful if patient data needs to remain private and between the patient and a specific member of your team.
To define the owner of a specific phone number:
- Visit your settings.
- Select Phone and SMS.
- Click into any of your Spruce Numbers.
- On web, select the ‘Number Settings’ tab. Choose the owner under "Owned By" on mobile or "Owner" on web. Please note that you will need to select "Edit" on web before you can change or choose an owner.
The owner can be an individual or a "Team" that you created within Spruce. If you choose a Team, then all members of that team will have access to the phone number. Read more about Teams here.
If you choose to change the owner later on, the new owner will be updated on all conversations in the system and will now be able to view all of those conversations. Please note: if someone is listed as an owner in the settings for a phone number, you will not be able to remove them from any specific conversations.
Managing Additional Members
You'll notice when defining the owner of a phone number that there is a field for "Additional Internal Members" if the whole organization isn't the owner. An additional internal member has access to the phone number. They will have access to incoming calls, texts, and voicemails to that number the same way the owner does and they'll be able to initiate new communication from this number. Add additional members when you need someone to cover for you or if you're sharing a phone number.
To add additional members:
- Visit your settings.
- Select Phone and SMS.
- Click into any of your Spruce Numbers.
- On web, select the ‘Number Settings’ tab. Choose additional internal members under "Additional Members" on mobile or "Additional Internal Members" on web. Please note that you will need to select "Edit" on web before you can change or choose members.
You can edit the owner and additional members at any time as long as you are an admin. Read more about who is an admin here.
If you choose to change the additional members later on, the new members will be updated on all conversations in the system and will now be able to view all of those conversations. Please note: if someone is listed as an additional member in the settings for a phone number, you will not be able to remove them from any specific conversations.
Adding Contact and Conversation Tags
You'll notice when editing the owner and additional members that you also have the option to add contact and conversation tags. You can learn more about contact and conversation tags here. To summarize, any conversation tags you add to the phone number will get applied to every patient conversation initiated with that phone number. They'll also get applied when someone reaches out to that phone number. If you remove the tag, the tag will no longer be applied to these conversations.
Adding a contact tag will add that tag to any contacts that are created by interacting with that phone number.
Tagging is helpful when you'd like to categorize patients or indicate that particular conversations belong to a specific provider. You can also create new inbox filters that show you conversations with a specific tag. Learn more about conversation filters here.
To add tags:
- Visit your settings.
- Select Phone and SMS.
- Click into any of your Spruce Numbers.
- Scroll down to apply tags, and choose which tags you'd like to apply where.
Phone Number Auto-Assignment
If you choose a specific teammate or Team to be the owner of a phone number, you'll also have the option of turning on "Auto-Assign." This means that anytime someone calls, texts, or leaves a voicemail for that specific number, the conversation will automatically get assigned to the owner of that phone number. This means that the conversation will fall in their "Assigned to Me" inbox/filter if the owner is an individual and the "Assigned to X Team" if the owner is a team. These conversations will not land in the main inbox. This is helpful if only particular teammates need to see incoming communication to that phone number.
To turn on auto-assignment:
- Visit your settings.
- Select Phone and SMS.
- Click into any of your Spruce Numbers.
- Click on the owner of the phone number.
- Toggle on "Auto-Assign" conversations. If it's blue, then it is turned on.
- If you're on web, be sure to select "Edit" first.
See this video demonstration on phone number auto-assignment and membership.
Spruce Link Ownership and Management
Spruce Links make it easy for your patients to connect directly with your practice. When they click on your Spruce Link, they'll be able to download the Spruce patient app and connect directly with your practice. They also make it easy for you and your teammates to initiate secure app-to-app messages. Each Spruce Link is a unique URL that follows this format:
https://spruce.care/123456 or https://spruce.care/practicename
When a patient clicks on your Spruce Link or enters the URL in their browser, they’ll see your Organization Profile. You can customize what they see when they land on your profile from within your Spruce settings. They may then select Connect and will be directed to the app store or web-based login. When the patient creates their account this way, they will be automatically connected to your practice, and a new secure patient conversation will appear in your Spruce inbox.
In addition, every new app-to-app patient message that is sent, will come from a Spruce Link on your account. You'll see your Spruce Link populate in the "From" field of a new message. Just like you can manage the owner and members of a phone number, you can also manage owners and members of your Spruce Links.
Creating your Spruce Link
You can create a Spruce Link from your Spruce settings, under the section titled "Secure Messaging". There, you'll have the ability to customize the link, label it, configure the default members, and even configure conversation and contact tags you'd like associated with your link(s). The QR code that is automatically generated when you create your link is just another way to share the same information.
Pro Tip: If you want your patients to be able to find and connect to your Spruce organization using only your Spruce phone number, make sure to create a custom Spruce link with your Spruce phone number as the url. For example, if your Spruce phone number is: 123-456-7890, then you should create this Spruce Link: spruce.care/1234567890
Managing Ownership
You can also use your Spruce Links to initiate new secure conversations with patients. When you send an SMS text message to a patient, it will come from your Spruce number, but when you send secure app-to-app messages, it will come from a Spruce Link. You'll notice when initiating a new secure message, that the "From" field will include your Spruce Link.
You can determine who the owner is for every Spruce Link that you create. If someone is an owner, this means that they will be able to see all communication sent to and from the Spruce Link. They'll be able to initiate secure messages and receive them. Non-owners will not have access to correspondence regarding this Spruce Link.
To manage owners:
- Visit your settings.
- Select "Secure Messaging."
- Select any Spruce Link and add or change the owner under the "Owned By" section on mobile or "Owner" on web.
Managing Additional Members
In addition to adding an owner, you can also add additional members to Spruce Links. Additional members can also see incoming communication to the Spruce Link and can initiate correspondence using the Link. Non-members will not have access to any conversations where the Spruce Link is involved.
To manage members:
- Visit your settings.
- Select "Secure Messaging."
- Select any Spruce Link and add or change the members under "Additional Members" on mobile or "Additional Internal Members" on web.
Please note that you cannot remove a member or owner from a specific patient conversation they're already in. You can, however, decide to change the owner and add additional members at any time. New members will have access to existing and new conversations.
Adding Contact and Conversation Tags
You'll notice that you also have the option to add contact and conversation tags. You can learn more about contact and conversation tags here. To summarize, any conversation tags you add to the Spruce Link will get applied to every patient conversation initiated with that Spruce Link. They'll also get applied when someone reaches out to that Spruce Link. If you remove the tag, the tag will no longer be applied to these conversations.
Adding a contact tag will add that tag to any contacts that are created by interacting with that Spruce Link.
Tagging is helpful when you'd like to categorize patients or indicate that particular conversations belong to a specific provider. You can also create new inbox filters that show you conversations with a specific tag. Learn more about conversation filters here.
To add tags:
- Visit your settings.
- Select "Secure Messaging."
- Select any Spruce Link and scroll down until you "Apply Tags."
- Apply any tags to the conversation or contact level.
Spruce Link Auto-Assignment
If you choose a specific teammate or Team to be the owner of a Spruce Link, you'll also have the option of turning on "Auto-Assign." This means that anytime someone sends a message to that Spruce Link, the conversation will automatically get assigned to the owner of that Spruce Link. The conversation will fall in their "Mine" inbox/filter if the owner is an individual and the "Assigned to X Team" if the owner is a team. These conversations will not land in the main inbox. This is helpful if only particular teammates need to see incoming communication to that Spruce Link. See this video demonstration.
To turn on auto-assignment:
- Visit your settings.
- Select "Secure Messaging."
- Select any Spruce Link and click into the owner if you're on mobile. Be sure to select "Edit" if you're on web.
- Toggle on "Auto-Assign Conversation" on web under the owner. Blue indicates that it is on and active. Select the owner on mobile and then toggle on "Auto-Assign Conversations."
See this video demonstration on Spruce Link auto-assignment and membership.
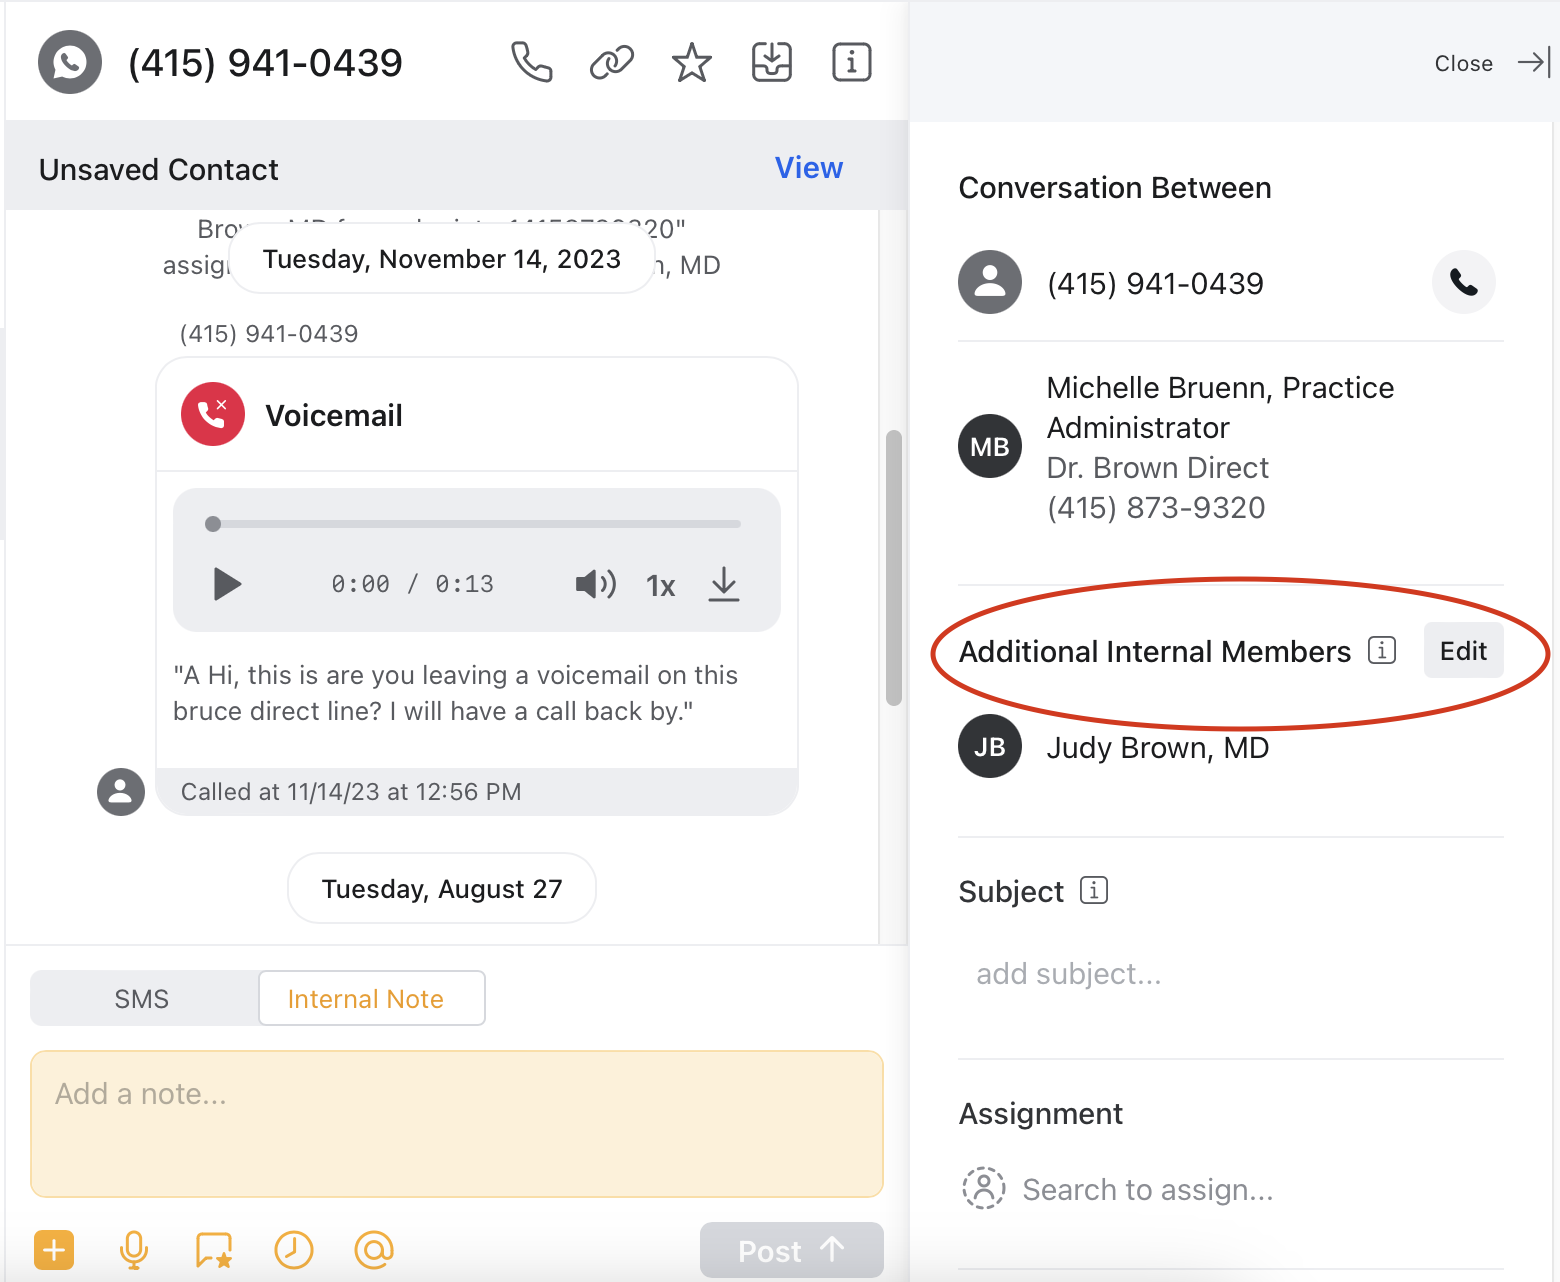
Granting Access to a Specific Conversation.
In some circumstances, it may be helpful to give a teammate access to a specific conversation with a number or Spruce Link that they are not a member of. For example, if you wanted to reach out to a colleague for advice on an issue with a patient, you might make an internal note in the patient conversation and request that they review the communication and offer their advice. In this case you could add them to this individual conversation by adding them as a member.
- On web or mobile, in the conversation view, select the information [i] icon in the upper right.
- Edit "Additional Internal Members"
- Add the person you want to give access to the conversation
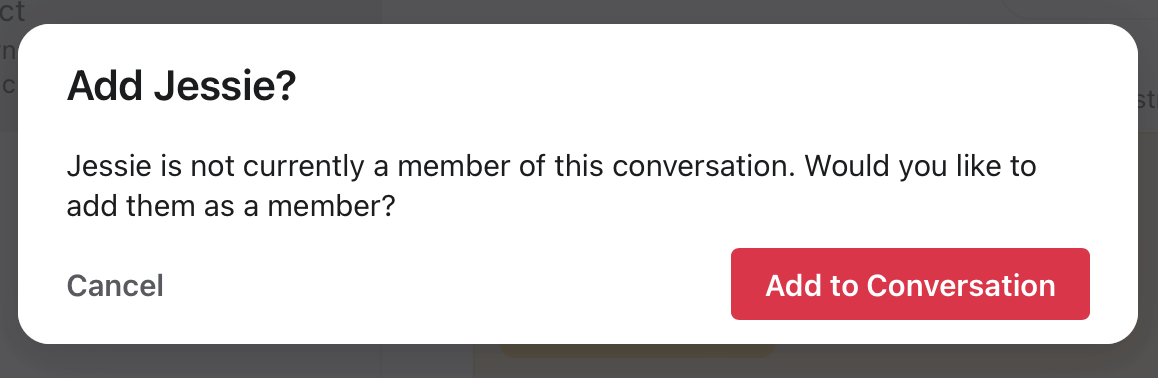
You can also use the @page function in the internal note to notify the person you wish to add, and you’ll receive a pop-up asking you to confirm that you would like to add them; if you agree, this will add them to the conversation and allow you to post the page.
Please note, if you add a teammate to a conversation, this will give them the ability to send SMS text messages from your number to the patient within that conversation, as well as to make calls to that patient from your phone number. However, your teammate will not be able to initiate new conversations or calls using your number, or to participate in any other conversations with your number, if you have not explicitly added them to those conversations. These same principles apply when granting access to a specific secure conversation. If you remove your teammate as a member of that conversation they will no longer have access to it; you may wish to do this if you wanted to grant temporary access for a specific situation.
Frequently Asked Questions
Do I own my Spruce phone number?
Yes. Phone numbers set up on Spruce are owned by your practice and can be ported to another provider if you cancel your subscription.
What is a Spruce Link?
Spruce Links are unique URLs associated with your practice that represent the connection point a patient uses when they download the Spruce patient app and connect to your practice for secure messaging or video calling.
How do I find and manage my Spruce Links?
Spruce Links are managed in your account settings under the phone and messaging configuration section.